As organisations move to the cloud, securing resources becomes a non-negotiable. In this writeup, I walk through how I implemented AWS IAM to control access between dev & prod environments, ensuring developers only interact with development resources, while administrators retain exclusive control over production.
This project simulates real-world IAM policy design, principle of least-priviledge, and account hardening using AWS best practices.

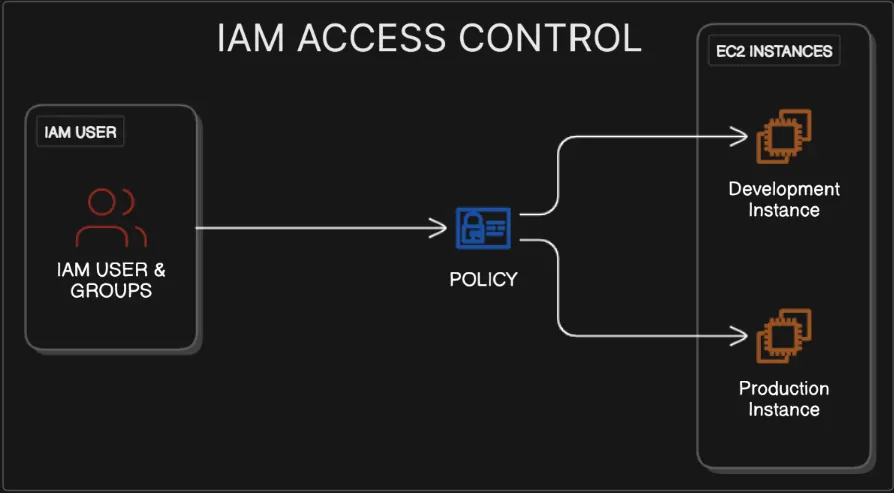
Project Scenario #
Imagine a startup with two Amazon EC2 instances:
- A Development server for building and testing features
- A Production server running live customer applications
As the cloud security administrator, my goal is to implement strong IAM controls that: ✅ Prevent developers from accidentally modifying production ✅ Allow administrators to manage both environments securely ✅ Make the AWS account human-readable by setting an alias
✅ Stage 1: Setting an AWS Account Alias #
Before anything else, I improved account observability by replacing a numeric account ID with a human-friendly alias.
Why this matters: In real teams, multiple AWS accounts exist (staging, production, sandbox). An alias prevents accidental deployments to the wrong account.
Steps:
- Navigate to IAM → Dashboard
- Under Account Alias, click Create
- Enter alias:
name-cloud-account

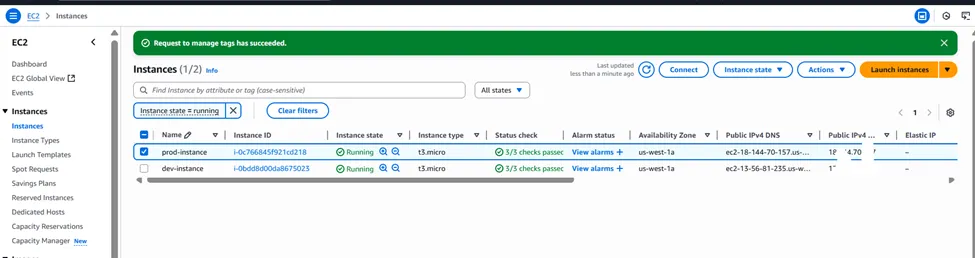
Step 2: Launch and Tag Two EC2 Instances #
We will launch two separate Amazon Linux instances. Tagging is crucial as our IAM policies will use these tags to grant permissions.
- Navigate to the EC2 Dashboard.
- Click Launch instance.
- Launch the Development Instance:
- Name:
dev-instance - Application and OS Images: Select
Amazon Linux 2023 AMI(or another as preferred). - Instance type:
t2.micro(eligible for the Free Tier). - Key pair (login): Proceed without a key pair, as we will manage these instances via IAM policies and the console, not SSH.
- Network settings: Keep the default VPC and subnet settings.
- Under Advanced details, expand the section and scroll to the bottom. Under Tags, click Add tag. [Key:
EnvironmentValue:Development] - Click Launch instance.
4. Launch the Production Instance:
- Repeat the process above.
- Name:
prod-instance - Use the same AMI and instance type (
t2.micro). - Proceed without a key pair.
- Under Advanced details -> Tags, click Add tag. [Key:
EnvironmentValue:Production] - Click Launch instance.
Part 1 Highlights 💡
This initial setup highlights two critical concepts. First, creating an account alias is a security best practice that simplifies the sign-in process for users by removing the need to know the numerical Account ID. Second, this section shows that tagging resources is not just for organization or billing; it’s a foundational element of a robust security strategy. These tags act as metadata that our security policies will use to dynamically grant or deny permissions.
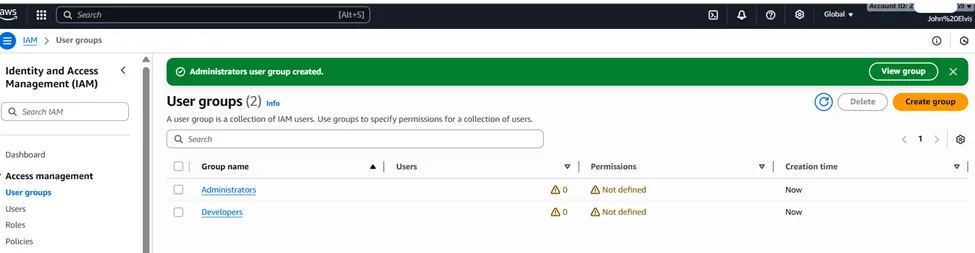
Part 2: Create IAM User Groups
User groups simplify permission management. Instead of assigning policies to individual users, you assign them to a group.
- Navigate back to the IAM Dashboard.
- In the left navigation pane, click on User groups.
- Click Create group.
- Create the Developers Group:
- User group name:
Developers - Leave the “Users” and “Permissions policies” sections empty for now.
- Click Create group.
5. Create the Administrators Group:
- Click Create group again.
- User group name:
Administrators - Click Create group.
Part 2 Highlights 💡
The key insight here is the importance of scalability and manageable permissions. Attaching policies directly to individual users is inefficient and becomes impossible to manage in a large organization. By creating user groups based on job functions (
Developers,Administrators), we are implementing a form of Role-Based Access Control (RBAC). This ensures that permissions are consistent for all users in the same role and simplifies administration significantly.
Part 3: Create and Attach IAM Policies #
This is the core of the project. We’ll create custom policies that grant specific, tag-based permissions.
Step 1: Create the Developer Policy
This policy will allow users to view all instances but only start, stop, or reboot the one tagged for development.
- In the IAM Dashboard, click Policies in the left navigation pane.
- Click Create policy.
- Select the JSON tab.
- Paste the following policy document. This policy has two statements:
- The first allows listing all instances (
_ec2:DescribeInstances_). - The second allows start/stop/reboot actions only on resources that have the tag
**_Environment_**with the value**_Development_**
{
    "Version": "2012-10-17",
    "Statement": [        {
            "Effect": "Allow",
            "Action": "ec2:DescribeInstances",
            "Resource": "*"
        },
        {
            "Effect": "Allow",
            "Action": [                "ec2:StartInstances",
                "ec2:StopInstances",
                "ec2:RebootInstances"
            ],
            "Resource": "arn:aws:ec2:*:*:instance/*",
            "Condition": {
                "StringEquals": {
                    "aws:ResourceTag/Environment": "Development"
                }
            }
        }
    ]
}-
Click Next: Tags, then Next: Review where you’ll name & describe the policy.
-
Click Create policy.

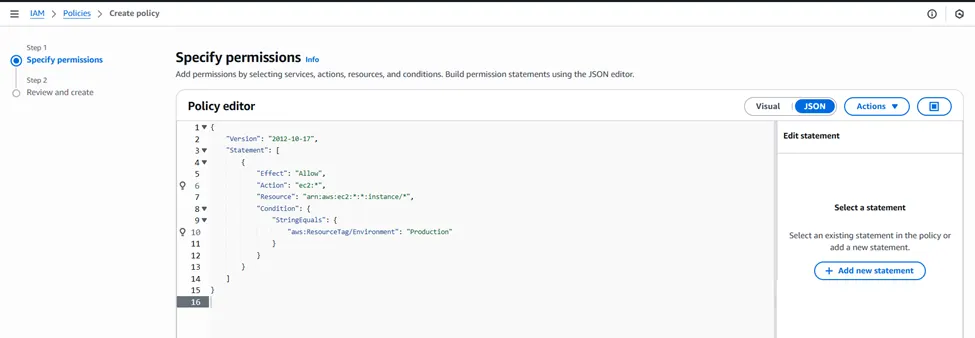
Step 2: Create the Administrator Policy #
This policy will grant full control over the production instance.
- Go back to Policies and click Create policy.
- Select the JSON tab and paste the following:
{
    "Version": "2012-10-17",
    "Statement": [        {
            "Effect": "Allow",
            "Action": "ec2:*",
            "Resource": "arn:aws:ec2:*:*:instance/*",
            "Condition": {
                "StringEquals": {
                    "aws:ResourceTag/Environment": "Production"
                }
            }
        }
    ]
}-
Click Next: Tags, then Next: Review where you’ll name & describe the policy.
-
Click Create policy.
Step 3: Attach Policies to Groups #
- Navigate to User groups, then Click on the Developers group.
- Go to the Permissions tab and click Add permissions -> Attach policies.
- Search for and select
DevInstanceAccessPolicy. - Click Add permissions.
- Go back to User groups and click on the Administrators group.
- In the Permissions tab, click Add permissions -> Attach policies.
- Search for and select
ProdInstanceAccessPolicy. Also search for and select the AWS managed policyAdministratorAccessto give them full admin rights as is common. - Click Add permissions.
**💡**Part 3 Highlights
This section is a practical application of the Principle of Least Privilege. The developer policy is a perfect example: it allows a broad, read-only action (
_DescribeInstances_) on all resources (_*_) but restricts sensitive actions (_Start_,_Stop_) to only the resources that meet a specific_Condition_—in this case, having the correct tag. This use of condition clauses is what makes IAM so powerful. It enables a dynamic, Attribute-Based Access Control (ABAC) model where permissions are not tied to specific resources but to their attributes (tags).
Part 4: Create and Assign IAM Users
Now, we create the user accounts and add them to their respective groups to inherit permissions.
- In the IAM Dashboard, click Users in the left navigation pane.
- Click Create user.
- Create the Developer User:
- User name:
DevUser - Select Provide user access to the AWS Management Console.
- Choose I want to create an IAM user.
- Under Console password: Select Custom password and create a secure password.
- Uncheck User must create a new password at next sign-in.
- Click Next.
- On the Set permissions page, select Add user to group.
- Check the box for the Developers group.
- Click Next, then Create user.
4. Create the Administrator User:
- Repeat the process: Click Create user.
- User name:
AdminUser - Select console access, create a custom password, and uncheck the password reset option.
- Click Next.
- Select Add user to group and check the box for the Administrators group.
- Click Next, then Create user.

Part 4Highlights 💡
Here, we see the clear separation of identity (the user) and authorization (the policies). The user object (
DevUser) has no permissions attached to it directly. Instead, it inherits all its permissions from theDevelopersgroup. This decoupling is crucial for efficient management. If a developer needs administrative access, you don’t edit their user policies; you simply move them to theAdministratorsgroup. This makes managing user permissions throughout their lifecycle (onboarding, role changes, offboarding) simple and less prone to error.
Part 5: Test Your IAM Configuration #
The final step is to verify that the permissions work as expected.
- Sign out of your current root/admin session.
- Use your account alias URL to sign in:
your-alias.signin.aws.amazon.com/console. - Log in as
**DevUser**with the password you created. - Navigate to the EC2 Dashboard.
- You should see both
dev-instanceandprod-instance. - Test successful access:
- Select
dev-instance. - Click Instance state. The options to Stop instance and Reboot instance should be enabled.
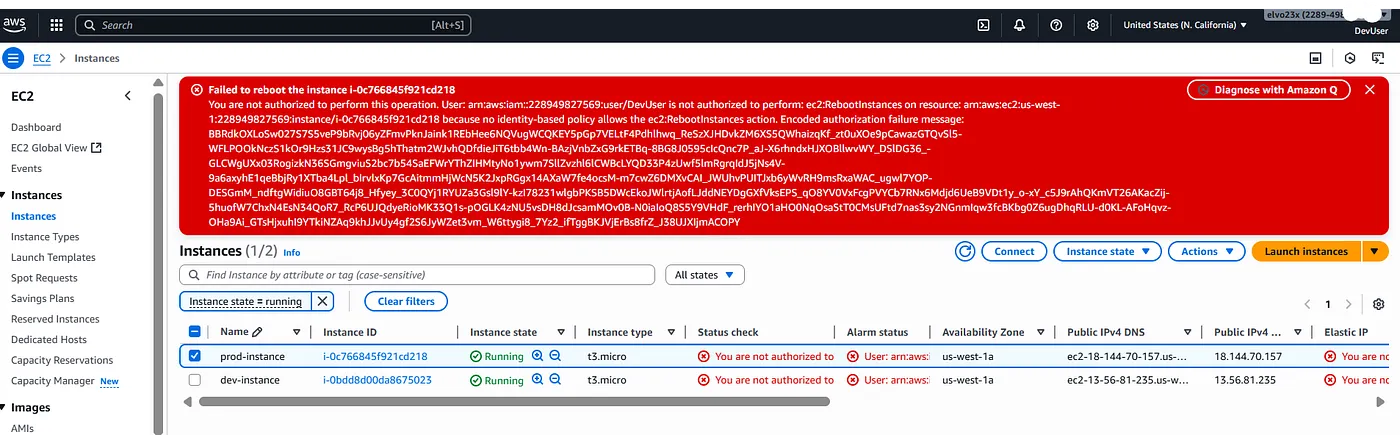
7. Test denied access:
- Select
prod-instance. - Click Instance state. The options should be greyed out, and if you try to perform an action, you will get an access denied error.
Test Production Policies
- Sign out and log in as
**AdminUser**. - Navigate to the EC2 Dashboard.
- Select
prod-instanceand verify you have full control. - Select
dev-instance. Because theAdministratorsgroup also has theAdministratorAccesspolicy, this user can manage the dev instance as well.

Conclusion #
Congratulations! You have successfully configured a secure AWS environment using IAM. You created user groups with specific, policy-based permissions that grant access to resources based on tags. This project demonstrates the principle of least privilege, a fundamental security concept where users are only given the permissions essential to perform their duties. This greatly reduces the risk of accidental changes or malicious activity in your production environment.
What I Took Away #
Cloud security is not just about denying access 😅 ,it’s about enabling the right access, to the right people, at the right time. This exercise demonstrated the power of Identity Access Management as a centralized security control mechanism in AWS.
